Thursday, 18 February 2016

Wireless home automation system

Wireless home automation system using arduino:

Today, we are going to discuss about wireless home automation system using arduino. This project consists of atmega 8 microcontroller, dtmf module (mt8870), relay, relay driver (uln 2003) and ac load.


                                                           Wireless automation video


Stay tuned !!

Monday, 15 February 2016

Robotics workshop at ngo


Workshop of basic robotics was organised by Robodude Technologies Pvt. Ltd. at Rajpuri Sanstha.
Children of the age group 10-16 years was present there. It was good to see how enthusiast they were.

We gave basic knowledge about robotics:

> What is robotics

> Parts of robot: chassis, actuator, geared motor,motor driver, sensor, power supply

> Different types of motor: line follower robot, edge avoiding robot, obstacle following robot and obstacle follower robot.  

Some pics of the session:


It was good to see their curiosity. Looking forward for more sessions so that kids from the weaker section can develop interest in science and technology.

Thank you Rajpuri Sanstha for providing such an opportunity.

Kudos to the team of Robodude for making it happen.


Get a workshop in your school or colleges. For more info, visit:
 Robotics Workshop in Delhi 

Thursday, 11 February 2016

What is Pulse Width Modulation (PWM)

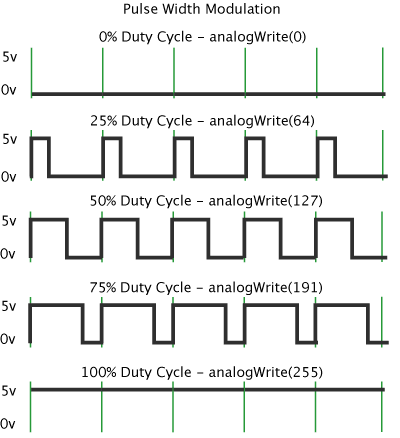
Pulse Width Modulation, or PWM, is a technique for getting analog results with digital means. Digital control is used to create a square wave, a signal switched between on and off. This on-off pattern can simulate voltages in between full on (5 Volts) and off (0 Volts) by changing the portion of the time the signal spends on versus the time that the signal spends off. The duration of "on time" is called the pulse width. To get varying analog values, you change, or modulate, that pulse width. If you repeat this on-off pattern fast enough with an LED for example, the result is as if the signal is a steady voltage between 0 and 5v controlling the brightness of the LED.


Fig- Pulse Width Modulation
In arduino uno, we have six pwm channels viz pin no. 3,5,6,9,10 and 11.

A sample program for rgb led:

  const int red=9,green=11,blue=10;    // read only variable

  void setup()                         // this loop will run only once
  {
      pinMode(red,OUTPUT);
      pinMode(green,OUTPUT);
      pinMode(blue,OUTPUT);
  }

  void loop()                          // infinite loop
   {
      analogWrite(green,255);          // 100% duty cycle
      analogWrite(red,127);            // 50% duty cycle
      analogWrite(blue,191);           // 75% duty cycle
   }

Fritzing sketch

PWM helps in saving power consumption

Stay tuned for more upates !!!

Monday, 1 February 2016

Industrial training at Robodude Technologies Pvt Ltd

Industrial Training
We provide six week/ month training for engineering graduates. This training is useful for ece, eie and electrical stream. We also make diy electronic and robotic kits for students, hobbyists and developers.

Internship in Delhi

Interfacing ldr with arduino uno

Interfacing LDR with Arduino Uno:-

What is a ldr?

LDR is short form of light dependent resistor. Basically it changes its resistance when subjected to light intensity. Ldr has layer of Cadmium Sulphide (CdS) on it. CdS change its resistance in accordance to intensity of light.

LDR- Light dependent resistor

Arduino ldr interfacing
Arduino code for ldr interfacing:


Arduino code for ldr interfacing

Output using serial window:

Output 

We can also display the output on 7 segment diaplay or lcd.

Ldr has a number of applications like night saver lamp and night vision camera.

Hope you guys will like it.

Stay tuned for more updates !!


Tuesday, 19 January 2016

Blinking a led using arduino uno

Just like our first program in C language is Hello World.
Our first program in arduino is blinking a led.

What is led?
Leds are light emitting diode, which emits light when subjected to forward voltage of 2.0 Volts and it requires current of about 25 mA. Leds comes in different colours viz. red, green, blue, white, etc.

Always check for its forward voltage and current consumption.

 How to check leds using multimeter?
 Set the multimeter on diode mode, now connect red probe to anode and black probe to cathode of led.
Checking led using multimeter


Now as arduino uno provides a logic of logic 1 (+5 volts) or logic 0 (0 volts). We have to connect external series resistor for led.

Some calculation:

According to ohm's law: V=IR

R=V/I

R=5000 mV/25 mA

R=200 ohms.

This is not a standard value.

We will use 220E resistor.

Code for blinking a led:

const int led=7;

// the setup function runs once when you press reset or power the board
void setup() {
  // initialize digital pin 13 as an output.
  pinMode(led, OUTPUT);
}

// the loop function runs over and over again forever
void loop() {
  digitalWrite(led, HIGH);   // turn the LED on (HIGH is the voltage level)
  delay(1000);              // wait for a second
  digitalWrite(led, LOW);    // turn the LED off by making the voltage LOW
  delay(1000);              // wait for a second
}


Upload the above using arduino IDE. That's it

Fritzing sketch of arduino uno


Stay tuned for more updates !!! 

Robotics companies in Delhi India

Tuesday, 12 January 2016